There’s a lot to be said for the all-round efficiency of a garden tool that does more than one job. This time, we’re not talking about the electric multi-tool - but instead, the battery-operated line trimmer/brush cutter combo.
- Space saving - no need for two tools when you can have one
- Go the distance - EGO’s ARC lithium 56V batteries give you enough time to get the job done
- Energy-efficient - design and cooling technology optimises battery performance
- Waste-conscious - less materials used in manufacture; less for you to recycle at end-of-life
There aren’t too many reasons not to buy a 2-in-1 tool. Except that you might be wondering about the experience of changing the line trimmer head for the brush cutter head, and vice versa.
Changing heads: step-by-step
Please wear gloves before any operation involving the blade.

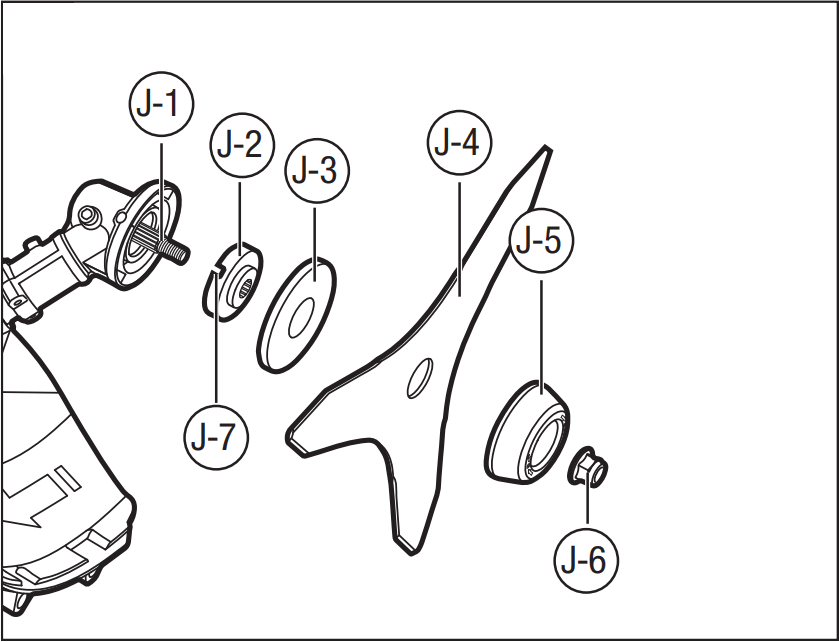
J-1: Shaft, J-2: Inner Flange, J-3: Flange Cover, J-4: 3-teeth Blade, J-5: Outer Flange, J-6: Nut, J-7: Slot in the Flange.
How to replace the brush cutter blade with the trimmer head
- Wearing gloves, rotate the blade to align the slot in the flange (J-7) with the shaft-locking hole in the gear case. Insert a stabilizer into the hole.
- Position the gear case against a solid surface for support. With one hand, hold the brush cutter shaft. With the other hand, grasp the multi-function wrench to loosen the nut clockwise.
- Take out the nut (J-6), outer flange (J-5), blade (J-4), inner flange cover (J-3) and inner flange (J-2) from the brush cutter. Place the 3-teeth blade into its sheath to prevent injury.
- Assemble the guard accessory to the brush cutter by tightening three screws with the washer.
- Mount the lower housing onto the gear case by tightening the nut and put the spring into its place.
- Fold and wind trimmer line onto the spool and place the line ends through the two opposite notches in the spool. Place the spool into its retainer with notches aligned with retainer eyelets. Align the retainer slots with the tabs on the spool base and press the retainer evenly down, ensuring that it snaps into place.
Always consult the full manual - see the relevant product page, or visit our manuals & safety sheets page for a link.
How to replace the trimmer head with the brush cutter blade

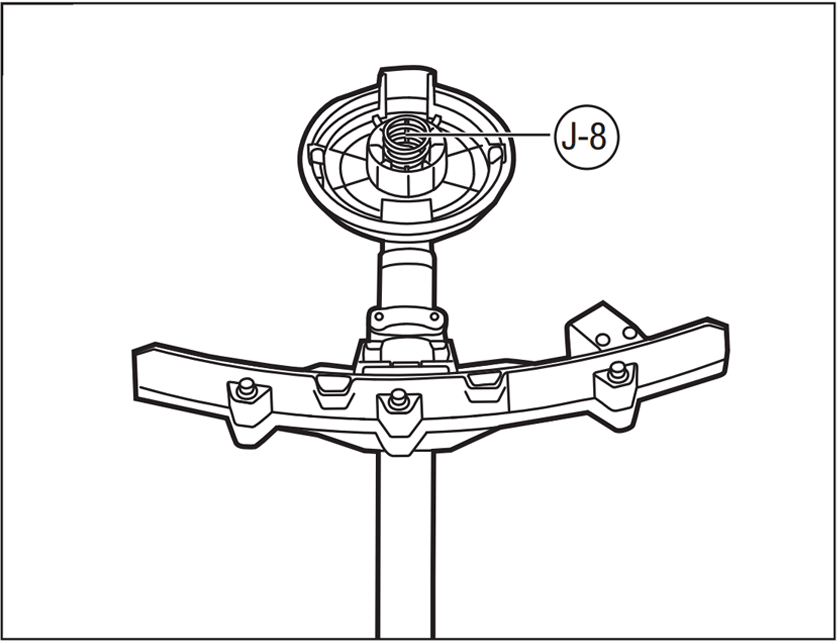
J-8: Spring
- Press the release tabs on the spool retainer and remove the spool retainer by pulling it straight out.
- Rotate the upper housing assembly to align the slot in the flange with the shaft-locking hole in the gear case. Insert a stabilizer into the hole.
- Rotate the socket wrench clockwise to remove the nut and upper housing assembly.
- Remove the guard accessory by loosening the three screws with the washer.
- We supply a sheath with the blade. Before mounting the blade, remove the sheath by undoing the clamp wire from the hook on the sheath. Wear gloves to do this.
- Mount the inner flange and flange cover into its place.
- Mount the blade onto the motor shaft, making sure the surface of the blade is flush with the surface of the inner flange bulge. Mount the outer flange and the nut. Pre-tighten the nut in a COUNTERCLOCKWISE direction by hand.
- Position the gear case against a solid surface for support. With one hand hold the brush cutter shaft and the other hand grasp the multi-function wrench to tighten the nut following the directional arrow icon marked on the outer flange.
Always consult the full manual - see the relevant product page, or visit our manuals & safety sheets page for a link.
The best line trimmer/brush cutter combo
There is ample choice when it comes to a formidable line trimmer/brush cutter duo.
Compatible with both a brush cutter blade and line trimmer head are:
- STX3800 Professional-X Line Trimmer/Brush Cutter (loop handle)
- BCX3800 Professional-X Line Trimmer/Brush Cutter (bike handle)
- ST1530E 38cm Line Trimmer (loop handle)
- BC3800E 30/38cm Brush Cutter/Line Trimmer (bike handle)
- BCA1200 Brush Cutter Attachment (loop handle)
- STA1500 Line Trimmer Attachment (loop handle)
These cordless tools sit between our Professional and our Professional-X ranges.
Not only are these tools dual-compatible between brush cutter and line trimmer, but they’re also compatible with our RTX2300 Rotocut tool. The multi-edged blades counter-rotate to reduce vibration and minimise throw, making it safer to use in built-up areas where risk of injury or damage may be greater.
As with all EGO products, both models come with an exceptional warranty, whether you’re a domestic user or a landscaping professional.
